Category: Mobile Troubleshooting | Website: Taazamind.com
Your Samsung Galaxy has been running fine for months — then suddenly it starts lagging after a software update, apps take noticeably longer to open, or the phone randomly restarts without warning. Before you factory reset or rush to a service center, there’s one underused fix that solves a surprising number of post-update performance issues: clearing the system cache partition. It lives in Android’s Recovery Mode, completely separate from your personal data, and takes under five minutes to do safely.
Here’s what’s actually happening: every time Samsung pushes a One UI update or Android version upgrade, the old cached system files from the previous build don’t always get replaced cleanly. These stale cache files conflict with the new system, causing sluggish animations, app crashes, random reboots, and battery drain that wasn’t there before. Clearing the cache partition forces Android to rebuild this cache fresh from the current software — no data loss, no app removal, no settings wipe. This guide covers the exact steps for Samsung Galaxy S, A, M, and Note series phones running One UI 4, 5, and 6.
Technical Specifications
| Technical Detail | Specification / Requirement |
|---|---|
| Target Device | Samsung Galaxy S / A / M / Note / FE Series |
| Target OS | Android 11–14 with One UI 4.0, 5.0, 5.1, 6.0, 6.1 |
| Problem Solved | Post-update lag, random reboots, app crashes, battery drain |
| Difficulty Level | Easy — no technical knowledge required |
| Estimated Fix Time | 3 – 7 minutes |
| Data Loss Risk | Zero — personal data, apps, and settings are untouched |
| Tools Required | Your Samsung phone only (no PC or cables needed) |
| Battery Requirement | Minimum 30% charge recommended before starting |
What Is the System Cache Partition — and Why Does It Need Clearing?
Before jumping into steps, it helps to understand exactly what you’re touching. Android maintains a dedicated partition on internal storage specifically for temporary system files — things like compiled bytecode, frequently accessed framework data, and UI rendering shortcuts. This is entirely separate from your personal storage where photos, messages, and app data live.
When you update One UI or Android, some of these cached files become incompatible with the new system version. Android doesn’t always wipe them automatically — it tries to reuse them for speed, and when the old cache conflicts with new code, performance degrades. Clearing the cache partition tells Android: “Start fresh. Rebuild only what the current system version actually needs.” Your first reboot after clearing takes 2–3 minutes longer than usual because Android is regenerating this cache from scratch — that’s completely normal and a sign it’s working.
Before You Start: Two Quick Checks
- Charge your phone to at least 30% — if it powers off mid-process inside Recovery Mode, you’ll need to repeat the steps, though no data is at risk.
- Note your phone’s exact button layout. Samsung Galaxy S21 and newer have no dedicated Bixby button — the volume and power buttons handle everything in Recovery Mode. Older models (S10, Note 10, A51, etc.) use the same layout. Confirm yours before starting.
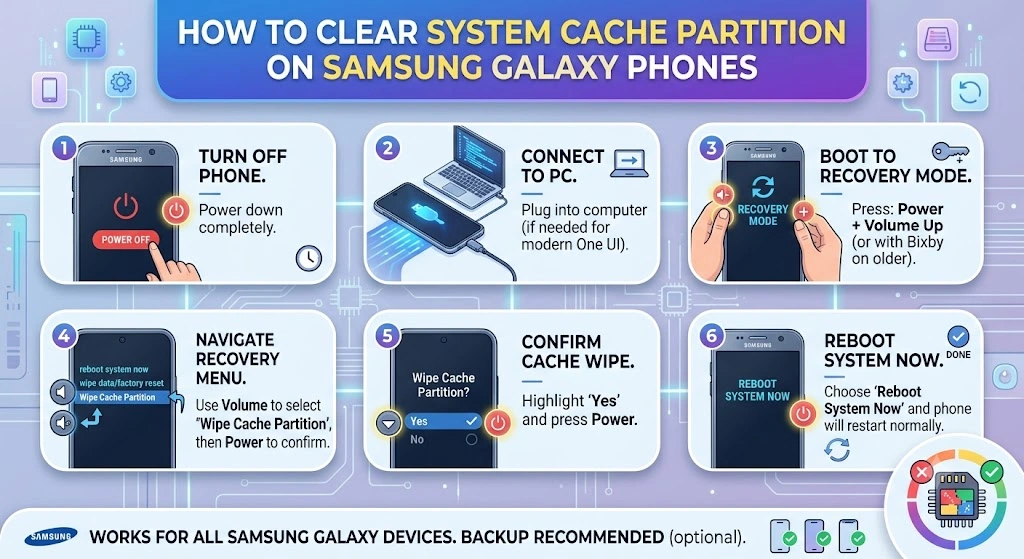
Method 1: Clear Cache Partition via Recovery Mode (All Samsung Galaxy Models)
This is the standard method that works across every Samsung Galaxy phone regardless of model or One UI version.
Step 1 — Power Off Your Phone Completely
- Press and hold the Power button on the right side of your phone.
- Tap “Power off” on the screen, then tap “Power off” again to confirm.
- Wait until the screen goes fully black — don’t proceed while the phone is still vibrating or showing the shutdown animation.
Step 2 — Enter Android Recovery Mode
This is the step that trips most people up. The button combination must be pressed in the right sequence, and timing matters.
- Press and hold the Volume Up button and the Power (Side) button simultaneously.
- Keep both buttons held for 5–8 seconds — don’t release early even if the screen flashes.
- Release both buttons the moment you see the Samsung logo appear and feel a vibration.
- Wait 10–15 seconds. The phone will briefly show the Samsung logo, then boot into Recovery Mode — a dark screen with white and blue text menu.
Tip for Galaxy S22, S23, S24 series: The Bixby/Power button is the same button on the right side. Press Volume Up + Side button together — same combination, slightly different feel than older models.
If your phone keeps booting normally instead of entering Recovery: Power off again, then try pressing Volume Up first and adding the Power button 1–2 seconds after. The timing window is narrow.
Step 3 — Navigate to “Wipe Cache Partition”
Recovery Mode has no touchscreen — navigation is entirely with hardware buttons.
- Use the Volume Down button to scroll through the menu options. You’ll see: Reboot system now, Reboot to bootloader, Apply update from ADB, Apply update from SD card, and Wipe cache partition.
- Scroll until “Wipe cache partition” is highlighted (it appears in a different color or with an arrow pointer next to it).
- Press the Power button once to select it. Do not hold — a single press confirms the selection.
Step 4 — Confirm the Wipe
- Read the confirmation screen — it will ask you to confirm wiping the cache partition.
- Use Volume Down to scroll to “Yes” if it isn’t already highlighted.
- Press the Power button to confirm.
- Watch the progress — you’ll see a series of lines scrolling as Android clears the cache. This takes 20–60 seconds depending on how full the cache was.
- Wait until you see “Wipe cache partition complete” or the menu returns to the Recovery home screen.
Step 5 — Reboot Your Phone
- Use Volume Down to scroll back to “Reboot system now” at the top of the Recovery menu.
- Press Power to select it.
- Expect the reboot to take 2–5 minutes longer than your normal startup — this is Android rebuilding the system cache from scratch. Do not interrupt it.
- Let your phone fully boot to the home screen, then wait an additional 2 minutes for background processes to settle before testing performance.
Method 2: Clear Individual App Cache (Without Recovery Mode)
If you’re experiencing issues with a specific app rather than system-wide sluggishness, clearing that app’s individual cache through Settings is faster and more targeted.
- Open Settings on your Samsung Galaxy.
- Tap Apps (on One UI 5/6) or Application Manager (older One UI versions).
- Tap the specific app that’s misbehaving — for example, Samsung Internet, Google Chrome, or Instagram.
- Tap Storage, then tap Clear Cache. Do not tap “Clear Data” unless you want to reset the app completely — Clear Cache removes only temporary files.
- Return to the app and test whether performance has improved.
Batch clear app caches on One UI 6: Go to Settings → Battery and Device Care → Memory → Clean Now. This clears background app memory and cache in one tap
Method 3: Use Samsung’s Built-In Device Care Before Trying Recovery Mode
If your phone is lagging but you’re not sure a cache wipe is necessary, Samsung’s Device Care tool is a good first step — it handles surface-level optimization without entering Recovery Mode.
- Open Settings → Battery and Device Care (on One UI 4+) or Device Maintenance (older One UI).
- Tap Optimize Now (the blue button at the top). This closes background apps, clears RAM, and removes temporary junk files automatically.
- Tap Storage → Clean Now to remove residual app cache files.
- Restart your phone afterward to apply the cleanup fully.
- Test performance. If issues persist after Device Care optimization, proceed to Method 1 (Recovery Mode cache partition wipe) for a deeper fix.
How to Know If the Cache Wipe Actually Worked
After rebooting, here are the signs that the cache partition wipe was successful and helping:
- First boot is noticeably slower — this is correct. Android is rebuilding the cache.
- Animations feel smoother within the first 5–10 minutes of use as the fresh cache fills in.
- Apps that were crashing before the wipe now open without errors.
- Battery drain that began after an update starts normalizing within 24–48 hours (the system is no longer fighting conflicting cached instructions).
If problems persist after the wipe, the issue is likely with a specific app or the update itself — in that case, check Samsung’s community forums for reports of the same bug on your exact model and One UI version.
Frequently Asked Questions
Will clearing the cache partition delete my photos, messages, or apps?
Absolutely not — this is the most important thing to understand before doing this. The cache partition is a completely isolated section of your phone’s storage dedicated only to temporary system files. It contains zero personal data. Your photos, WhatsApp messages, contacts, installed apps, accounts, and every setting you’ve configured remain 100% intact after a cache partition wipe. This is fundamentally different from a Factory Reset, which does erase everything. Think of the cache partition as a scratchpad Android uses for speed — wiping it just hands Android a clean scratchpad to write on fresh.
How often should I clear the system cache partition on my Samsung Galaxy?
You don’t need to do this on a regular schedule — it’s a targeted fix, not routine maintenance. The right time to wipe the cache partition is specifically after a major One UI or Android version update if you notice performance regressions (lag, crashes, unusual battery drain) that weren’t present before the update. Doing it monthly or “just in case” offers no real benefit, since Android rebuilds the cache to an optimal state quickly anyway. Some users also find it useful after a phone has been running for 1–2 years and general sluggishness has crept in, but Samsung’s Device Care (Method 3) should be tried first in those cases.
My Samsung Galaxy is stuck on the Recovery Mode screen and won’t reboot — what do I do?
If the Recovery Mode menu has frozen or your phone is unresponsive on the Recovery screen, perform a forced restart: press and hold the Volume Down button and the Power (Side) button simultaneously for 8–10 seconds until the phone vibrates and restarts. This is a hardware-level reboot that bypasses the software state — it’s safe to do at any point in the Recovery process except during the actual wipe (the 20–60 seconds when you see text scrolling). If the forced restart drops you back into Recovery Mode automatically, select “Reboot system now” and press Power to exit. If your phone repeatedly enters Recovery Mode on its own, that’s a sign of a deeper software issue and Samsung’s Smart Switch PC tool or a service center visit may be needed.